Program Your Own PSYN Lead Synth Sound

Program your own lead synth sound in the PSYNII subtractive soft synth bundled with P5. This is a tech tip that originally appeared on the old www.project5.com web site but has been taken down by Cakewalk. The article has been republished here. The host environment is P5 V1, but the concepts apply regardless of host, so you can still use this tutorial with P5 V2.
We won't try and give you a complete progamming course on PSYN in this one small tutorial. But we will show you just how easy it is to start creating your own sounds. The steps that follow will show you how to make a simple Moog lead sound in PSYN.
Insert PSYN
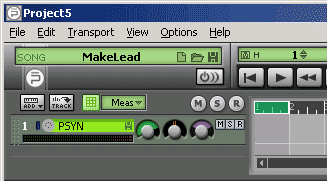
The first step is to insert PSYN in the Tracker window. You can do this in two different ways: Right-click in the tracker pane, select "insert synth", then "PSYN" or click the "Add New Synth Track" button and select "PSYN" from the pull down menu.
Select an Empty Program Slot
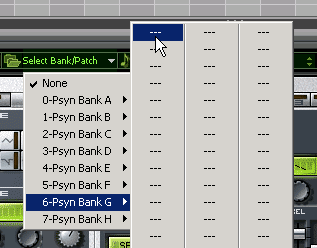
We want to begin with a blank slate so let's select an empty program slot. I've chosen the first slot in Bank G. Note: You won't really begin with a "blank slate" when you select an empty program slot. PSYN defaults to a basic SINE wave for any empty program slot.
Name your Patch

There's nothing like going in with confidence - so even before we've done anything with this patch, let's go ahead and name it. I've chosen to name mine "My Lead".
In order to change the name of a patch, you simply SHIFT-CLICK in PSYN's patch name field to make it editable. Once you've typed in your new name, click anywhere else in the Syn Ops panel to finish.
Save the PSYN Patch
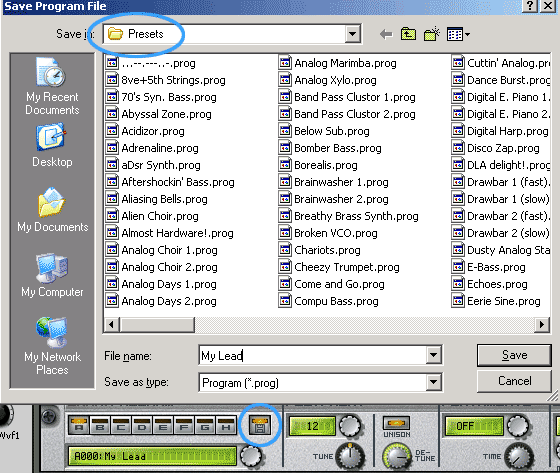
Even though we still haven't done any programming yet, it's still a good idea to save the patch from the outset. That way we know we have a patch saved and can continue saving it as we modify settings in PSYN.
To save the patch, click on the "save" button in PSYN's bank and program selection area. Navigate to PSYN's "Presets" folder and give it a name. Note: PSYN's default location for presets on Windows XP is C:\Program Files\Cakewalk\Shared Dxi\PSYN\Presets.
Check Your Patch
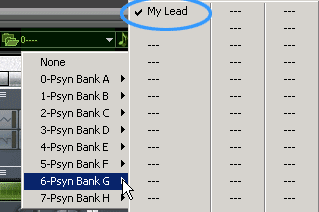
If you did everything correctly, you should now see your patch listed in the first slot in Bank G. Now we can begin modifying this sound in to our basic Moog lead.
Add a 2nd Oscillator, Choose a Waveform, and Combine Them
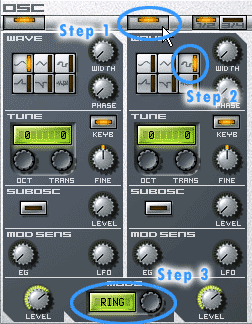
Gosh! all that preparation and now the programming part is so simple.
To fatten up our lead sound, we're going to add another oscillator, select "square" for the wave type, and then combine them together with a Ring Modulator.
The steps:
- Press the "on" button for oscillator 2.
- Select "square" for the wave type.
- Change "mode" from "NORM" to "RING"
Note: A ring modulator accepts two inputs and produces the sum and difference frequencies of them. For example, if two sine waves of 100 and 150 cycles are present at the inputs, the output will consist of two frequencies 50 cycles (150 minus 100) and 250 cycles (150 plus 100). Waves with many partials, such as rectangular or sawtooth waves, create very complex output signals. Ring modulators offer a convenient way to create metallic sounds, bells and klangs. (Definition obtained from: http://www.synthfool.com/ringmod.html)
Adjust the Low Pass Filter (LP12) Cutoff
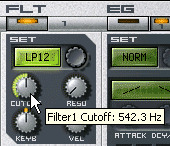
Since our lead sound is a little on the dull side, I think we should crank up the cut off frequency for the low pass filter. Turn the Cutoff frequency of Filter 1 up to around 7364 Hz. That should give it a little more "buzz". Note: A couple of things to watch out for: Make sure the "on" button is lit above the filter and make sure the filter type is set to "LP12" - which stands for Low Pass 12 dB/octave.
Add Some Sub Oscillator to Oscillator 1
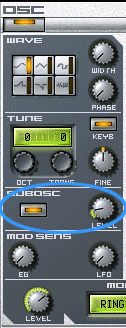
Finally, to add some "meat" to our sound, let's add a little sub oscillator to Oscillator 1. Simply click the Sub Osc button to turn it on, then turn the level up to about 8 o'clock (or to what suits your ears).
Set up Assignable Controllers in Syn.Ops
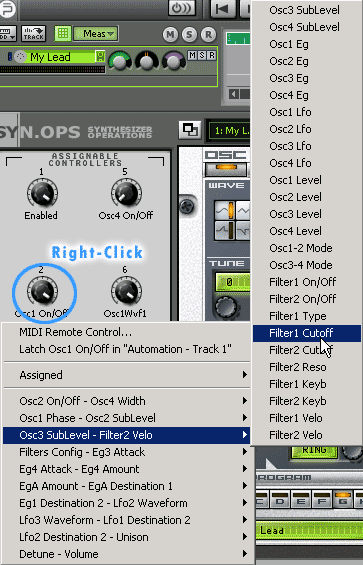
This part is specific to P5 V1, you would assign controllers the V2 way in P5 V2.
Before we can assign a controller from our keyboard to a parameter in PSYN, we need to have the control we want to manipulate listed in Syn.Ops's Assignable Controllers pane.
To do this, simply do the following:
- Right-click on one of the control knobs (in this case - #2) in Syn.Ops' Assignable Controller pane.
- Navigate to the parameter you wish to control (in this case - the cutoff for filter 1).
- Release your mouse. Your parameter should now be listed under knob #2.
Select MIDI Remote Control
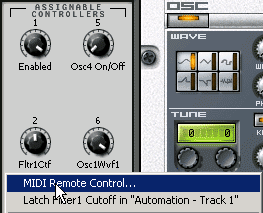
Once the parameter is assigned, right-click again to select "MIDI Remote Control" from the pull-down menu.
Have P5 "Learn" Your Controller
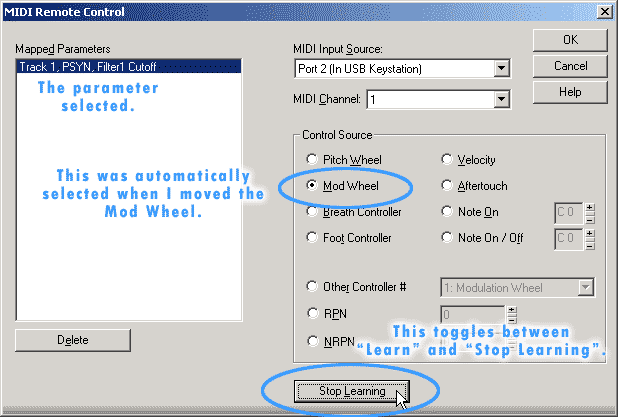
Once the MIDI Remote Control window is launched, it's simple to assign a parameter to a control on a keyboard. By pressing the "Learn" button at the bottom of the screen and then moving the controller I want to assign, I can easily have Project5 identify what controller it is I'm moving. In this example, I pressed "Learn" and then moved my Mod Wheel effectively assigning my Mod Wheel to control the frequency cutoff of filter 1.
Here are the steps:
- Click the "Learn" button at the bottom of the screen. (It will change to "Stop Learning".)
- Move the control you want to assign (in this case - it was the Mod Wheel).
- Click "Stop Learning".
- Click "OK" to finish.
- Move your Mod Wheel and you should see the frequency cutoff for filter 1 move with it.
Assign Filter 1 Resonance and Set Remote Control to Pitch Bend
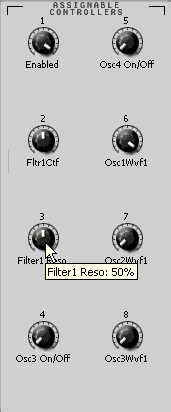
The way this lead part is set up now, the Mod Wheel will increase or decrease the frequency cutoff of the filter allowing the user to play filter sweeps in real time while soloing. I also want the resonance of filter 1 to increase when I pitch bend up and decrease when I pitch bend down. I can accomplish this by assigning filter 1's resonance parameter to the pitch bend wheel.
Here are the steps:
- Right-click the 3rd controller in Syn.Ops.
- Select "Filter1Reso" from the pull-down menu.
- Right-click the 3rd controller again.
- Select "MIDI Remote Control" from the pulldown.
- Click the "Learn" button at the bottom of the screen. (It will change to "Stop Learning".)
- Move the Pitch Bend Wheel on your controller.
- Click "Stop Learning".
- Click "OK" to finish.
- Move your Pitch Bend Control Wheel and you should see the frequency resonance for filter 1 move with it.
Give Your Patch Some Delay
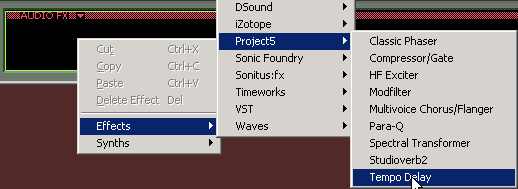
To give your patch some life, insert Project5's Tempo Delay in the Audio FX bin and assign the default patch. Now play your PSYN patch while moving both your pitch bend and mod wheel. Pretty expressive, huh?
Save Your PSYN Patch

Don't forget to save your PSYN patch again (now that all the cool additions have been made).
Save it as a Track Patch
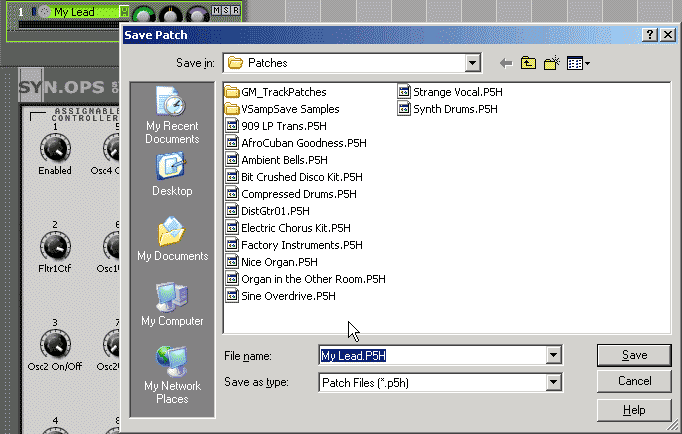
And don't forget to save the whole thing (Remote Controlled Parameters, Effects, etc.) as a Track Patch in P5 V1 (or Device Chain in P5 V2) so you can call this ripping lead sound up anytime.
Note:
- Here is the Track Patch file - so you can check to see if your final result is similar. Just right-click and save the file locally. Then put it in your default Track Patch location: C:\Program Files\Cakewalk\Project5\Patches
- Here is the PSYN Patch file. Put it in your default PSYN patch location: C:\Program Files\Cakewalk\Shared Dxi\PSYN\Presets
- Here is a small P5 song file with the patch used as a solo.