SFZ Grand Piano
The following tutorial is a general introduction to the .sfz format. It will discuss an existing preset in Dimension/Dimension Pro, and in the process, examine the .sfz file that serves as the basis for it.
Loading the Preset and Opening the sfz File
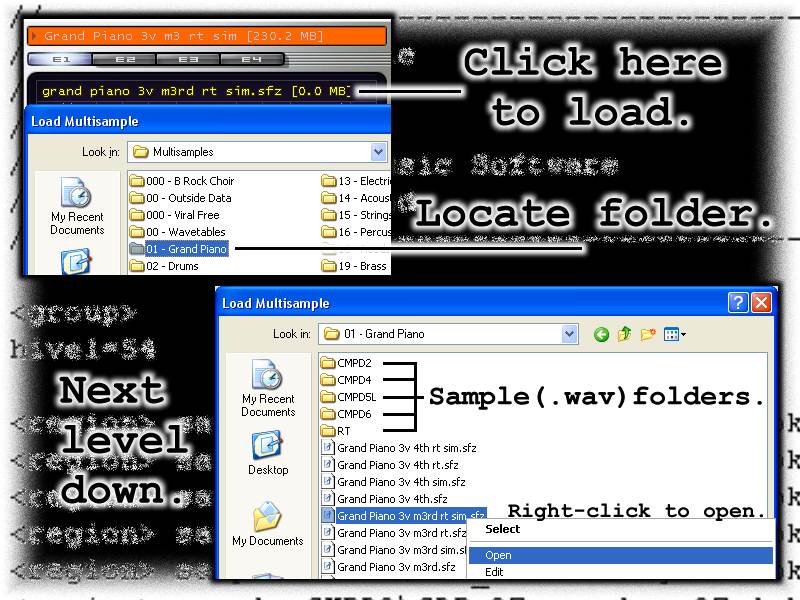
The preset used here is the "Grand Piano 3v m3 rt sim [230 MB]" Use the Program Browser to locate it under "11 - Pianos". The .sfz file behind the .prog goes by the same name, with a different file extension: "grand piano 3v m3 rt sim.sfz". Look to the image above to locate this file, under the "01 - Grand Piano" subfolder of Multisamples. Right-clicking on that file (in Windows) will bring up a text editor (Notepad, WordPad, etc.).
A quick look at the sfz file makes it appear to be very complicated. Breaking it down into sections will make it easier to understand, and it becomes discrete steps toward building a result. If you plan to change the file in any way, make a copy of it first to experiment with. The file name itself holds some clues as to what's inside. There'll be more on this later on.
- grand piano:
- The type of instrument originally sampled.
- 3v:
- It has three sets of samples triggered by three velocity levels.
- m3:
- The original piano was sampled at every minor third along its entire range.
- rt:
- This file uses the release trigger feature.
- sim:
- This file also uses the resonating string simulation.
Comments
First you'll see the comment lines. Anything preceded by // is ignored by Dimension. You use these lines to make notations about the details of your work, or credits and copyright information. Myself, I use commented lines to test out different techniques. Put // before a programming line, and it gets passed over. Remove the slashes, and it's back in the process again.
Groups
There are five separate sections to the main file. The first four of them use the <group> opcode. A <group> is simply a way to combine controls, and keep the text to a minimum. It affects all of the <region>s that follow it, until it reaches another <group> opcode. Then, the controls in the next <group> take effect. Let's look at the first 3 <group> opcodes, and save the last one for later.
<group>
hivel=54

<group>
lovel=55 hivel=107

<group>
lovel=108
These lines use the lovel= and hivel= codes to build velocity layers in the file. The first <group> covers about 2/5 of the entire velocity range (0-127 velocity levels). Only the softest notes trigger this <group>. It only uses a hivel= code. Leaving out lovel= assumes a value of zero as the lower limit. The next <group> covers the middle 2/5, between a velocity of 55 and 107. Most of your performed notes may end up here. In the last, the "hardest" hit notes take effect. Using only the lovel= opcode makes the range 108 to 127.
There are three complete sets of samples under each <group>. Only the first batch plays when you send velocities of up to 54; the second set: 55 to 107, and the third set covers the rest. Playing louder or softer controls which set of samples are sounded. Which brings us to all of those <region>s:
Regions
Each .sfz file has to contain at least one <region>. It's an opcode that's the basic container for your samples, and many of the operations that modify your samples. You can have more than one sample and <region> sounding together at the same time. That's not a great idea for a piano preset, and that's the reason that you see so many individual <region>s and definitions listed here. You want one sample for every (few) key positions, and you want those samples to change in sets as you strike softer or louder notes (by <group>).
Samples
The sample= code is a locator. It tells Dimension where to look for an individual sample file. In the image above, you'll see the sample file folders above the .sfz file location, and that's where the samples themselves reside. Let's take a look at the very first <region> in this sfz file, and take it apart step by step:
<region> sample=CMPD2\CDP_22.wav key=22 lokey=21 hikey=23 tune=3
- <region>
- Attention: things are about to change.
- sample=
- Dimension, we've got a new place for you to look ...
- CMPD2\
- ... and it's inside this particular folder.
- CDP_22.wav
- This is the file that I want to process.
- key=22
- I need it to be centered on MIDI Note number 22, where it was originally sampled ...
- lokey=21
- ...but I also want to stretch it to cover the note below that ...
- hikey=23
- ... and the key above that. I get three notes covered for the price of one good sample.
- tune=-3
- It sounds a little off, especially when I play it with other notes. Fine tune and sharpen the three notes just a little.
The same type of process is repeated with each new <region> and new sample. It's a whole lot of the same thing, but that allows for a fine degree of control over each individual sample. There'll be a new folder location and another sample. Then it's tied to a new MIDI key center, and covers notes above and below that center. The notes range from 0 to 127, and cover the lowest possible C, to the highest possible G. Each one is tuned by a slightly different amount, from /- 100 cents (one hundred cents make up a semitone, or 'note').
You can also use note names in .sfz editing, but there's something to be aware of. At least three standards of note naming exist, and that can lead to confusion. A convention of C-1 to G9 is used with .sfz editing. There are also "standards" of C0 to G10, and C-2 to G8. It's all the same notes, but you can see why MIDI Note numbering eliminates some possible errors. This preset (along with many other patches), doesn't use all 128 possible notes. Instead, they're limited to a natural range of the instrument being reproduced.
Loop Mode
You may have noticed a loop_mode opcode on several of the higher sample <region>s in each <group>. If there is no loop_mode defined, it means that the sample plays back according to what's internal to it. With these handfuls of samples, the loop_mode=one_shot command overrides that programming. It forces the sample to play through from beginning to end; no matter how long you hold down a key, or how short of a time passes before you release it. That mimics characteristics of a real piano, and it only happens on somewhere around the upper 20 notes of this emulation.
Release Triggers
Skipping down past the first three <group>s of <region>/samples (controlled by note velocity), there is a fourth <group>, and it controls the sound of a piano when you release keys. For a fuller explanation, go to DimensionalTips Piano High Notes Undamped vs Damped. The entire set of <region>/samples that follow it are there for one reason: to produce the sound that's made when a hammer lifts off of the piano strings. You'll see the same types of sample=, key=, lokey=, hikey=, and tune= definitions there, but one more type is added: the volume= definition. These are adjustments made to each <region>/sample to fine tune it's own volume level (in relative dB units). We'll bring up that <group> now to examine it.
<group>
trigger=release_key rt_decay=1 volume=-34 volume_oncc2=12
- trigger=release_key
- This is the condition under which the samples that follow will play. In this case, it's note release on a per-key basis.
- rt_decay=1
- The sample triggered will fade out by 1dB for every second of time.
- volume=-34
- Sets the sample playback volume down 34 dB to start.
- volume_oncc2=12
- If you have a control on your keyboard mapped to Breath Control [CC 2], you can use it to raise the volume of the release trigger samples by 12 dB.
Effects
Almost done. There's a new opcode introduced at the very bottom: the <effect> code. In this configuration (no sends, returns, or mixers), it'll process all of the <region>/samples that come before it. Of course, only those that meet the conditions of a <group> will be sounding now. There's all manner of <effect> types: delays, phaser, filters, distortion, and quite a few more unavailable to the front-panel interface. One of those is a strings type. Again, there's more detail on this to be found in the DimensionalTips Piano High Notes Undamped vs Damped tutorial. Here's the core breakdown:
- <effect>
- This signals that there's overall processing about to take place ...
- type=strings
- and this picks which <effect> it will be.
- strings_number=36
- This will set the number of strings that will sympathetically resonate when you play other notes.
- strings_wet_oncc1=100
- CC1 is the continuous controller number for the mod wheel. If you bring your mod wheel up fully, the strings <effect> has a wet (effect) level of 100%.
Then There's That Front Panel ...
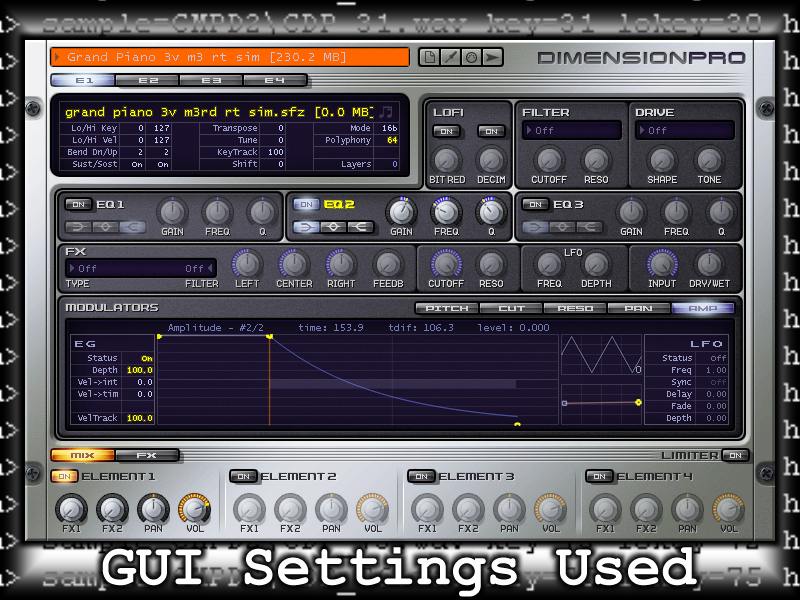
That sorts out the .sfz file underneath. But anything that you do on the graphical interface of Dimension either overrides the .sfz parameters, or enhances it with other features. In this case, the Grand Piano preset builds on the .sfz file underneath it. Check out the image below. The parameters involved are all highlighted in yellow.
GUI By Parameter
There's really not much added to this .sfz file. One Element is used, and there's no filters, lo-fi, insert or master effects, etc. involved. I'd hope not: it's a grand piano. There are a couple of important areas, though. For one, the Polyphony has been raised to 64 voices, to cover all of those long, sustaining piano notes. The VelTrack has been raised to 100.0. The Amp EG becomes totally controlled by your keyboard velocity.
EQ 2
There's a little fine tuning of the overall sound here, using a low-shelving EQ. The Gain has been raised by 5.2 dB, centered at 139.3 Hz. with the Freq knob. The bandwidth (Q) has been narrowed to 0.6. It gives a little kick to the low end.
Amp Modulator KeyTrack
Notice that the right node has been slightly raised here. It gives a small boost in volume to higher notes on the keyboard.
Amp Modulator EG
Here's where the overall 'loudness' contour gets its shape. (See also the Master of the Amplitude Envelopes tutorial.) The same thing could've been done in the .sfz file, but here, it easy to adjust. There's an instant 'attack', in that the default node (Amplitude - #0/2) is at a level of 1.000, and at 0.0 in the 'timeline' (the lifespan of a single note). That only allows you to reveal all of sample starting point, as the true 'attack' is contained within the recorded sample.
The second node (#1/2) is still at a full level of 1.000, but 47.6 milliseconds down the line. Its position ensures that you'll hear something when you strike a note. It's also the sustain point, and a note will hold this position until you decide to let go of it. (Press S on the Qwerty to toggle this point.) But there's a limit to how long a note will hold, and that's determined by the internal length of the core samples themselves.
You'll find the third node (#2/2) has a 'natural' curve to it. (See the Naturally Released tutorial.) It ends up dropping the level to 0.000 at 153.6 milliseconds. This is 106.3 ms. after you release a note, but with a twist. By clicking on K on your Qwerty keyboard, you can adjust the length of any 'curve' segment by keyboard position. In this case, higher notes on the keyboard shorten the final 'decay' time of the envelope's release portion. Just like a real piano.
Well. That's that.
- b rock