MIDI FX Inside Hardware Synths
By using Project5 in conjunction with your MIDI-capable hardware synth, any MIDI FX plugin will produce hard MIDI data within the synthesizer itself.
Introduction and Concepts
By using P5 in conjunction with your MIDI-capable hardware synth, any MIDI FX plugin will produce hard MIDI data within the synthesizer itself. This includes note information, transposition, the arpeggiator, controller messages, and any pattern/automation loaded in a track. Audio results will be heard on a properly routed Project5 audio track. The MIDI FX processing can also be returned to an adjacent track for permanent recording of editable data and further manipulation.. Click on the thumbnail below for a signal flow chart within Project5.
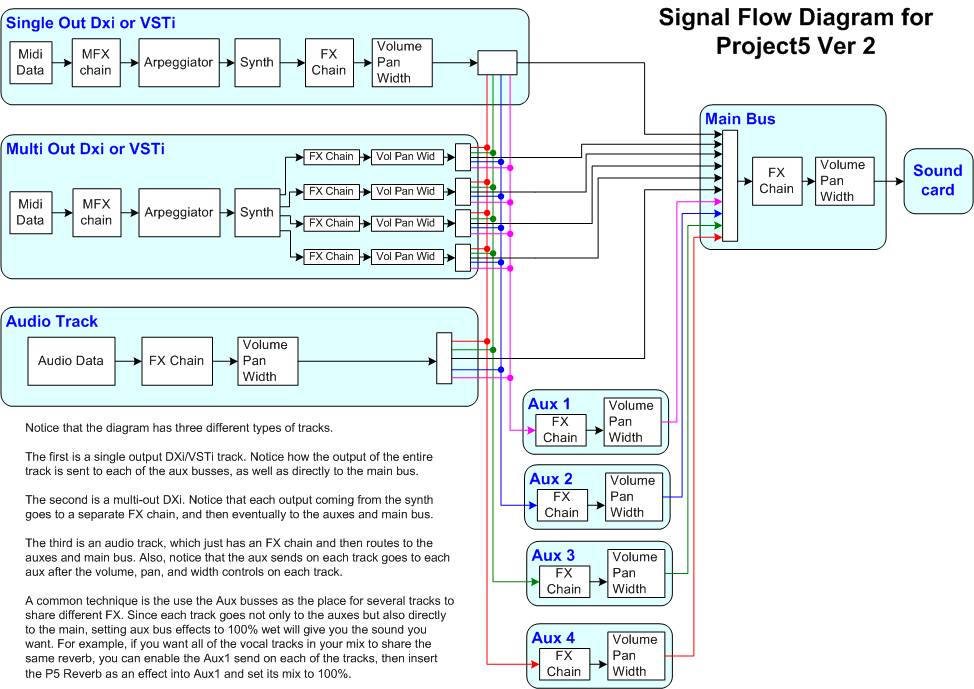
The secret to this process lies within rgc:audio's MIDIOut plugin, which is placed in the Synth slot in the flowchart above. It will intercept the data shown before it, and funnel that to an outside MIDI port. For more information and a download location to get the MIDIout plugin see the External Synths article. The other key component is your hardware synth's ability to switch to Local Off.
Local Off
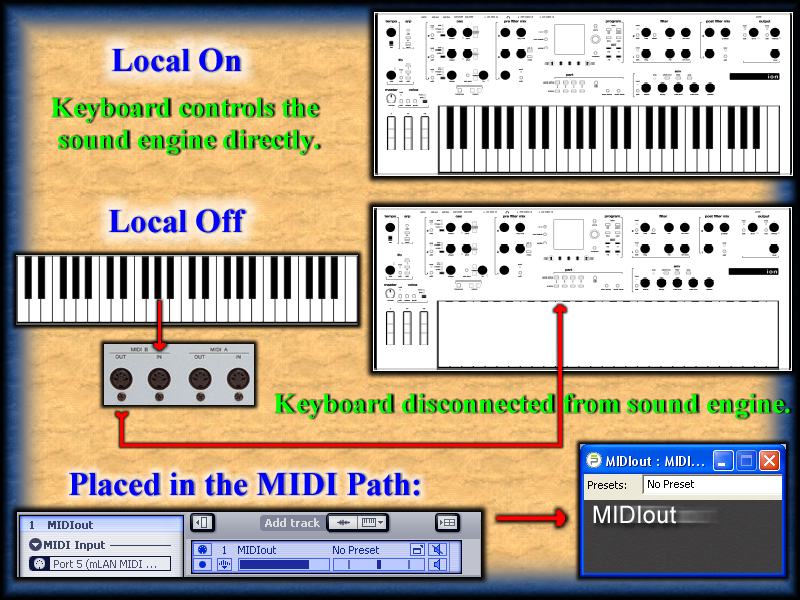
Local On is the 'normal" condition of hardware synthesizers. The physical keyboard is connected directly to the internal sound engine, and any notes played on it are routed directly. Local Off separates the keyboard from it's sound module. One common use is to configure the synth as a playback unit for a sequencer, and prevent any doubled note information from reaching the sound module. The keyboard transmits it's information only through the MIDI out plug, and the sound module will only receive its instructions through the physical MIDI In jack.
By placing Project5 and the MIDIOut plugin directly in that path, any MIDI FX (and some of the track information) processes and merges with this signal. Each hardware synth is slightly different in implementing Local On/Off. Some have a front panel switch, but most modern synths will implement this as an internal menu item. It's a global setting, and may be named as "midi only" or similar, or be triggered by CC# 122 as a Channel Mode message. A full value of 127 (7F in hex), or sometimes any non-zero number is Local On; sending 00 turns Local to Off. Check your synth documentation for specific information on setting Local Off in your own hardware.
Basic Setup Procedures
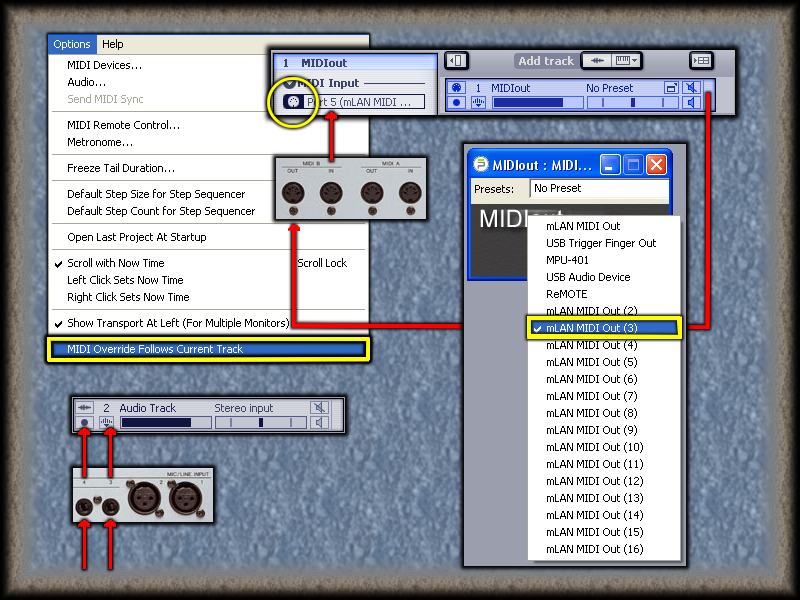
Here's one important idea to grasp in a clean setup without the possibility of MIDI feedback. We've set Local Off in the hardware synth to force it to follow a specific path. The same care must be taken in software (Project5) to make the MIDI signals flow in a specific path. That means that MIDI Override ''must go''. MIDI Override "listens" for any signal coming into your computer, and routes it to a given track. That will include what you want in the track, and also what you don't want. It's the exact same concept as holding a microphone next to a speaker that's part of its own signal path. Go to the Options menu, and uncheck "MIDI Override Follows Current Track".
In the Track Inspector of your MIDIOut track, make sure that MIDI Override is disabled. You want that track's input to reflect the MIDI In port of your computer that corresponds to the signal from your hardware synth, and ''only that signal''. "All Ports - Omni" is much the same thing, and should be avoided. The output Port from the MIDIOut plugin is configured by clicking on the MIDIOUT text itself in the synth's Properties. This will send the data directly to your soundcard's MIDI Out plug, to be sent to the synth's MIDI In jack. The stereo audio from your hardware is cabled to your soundcard Line In jacks.
Detailed Routing
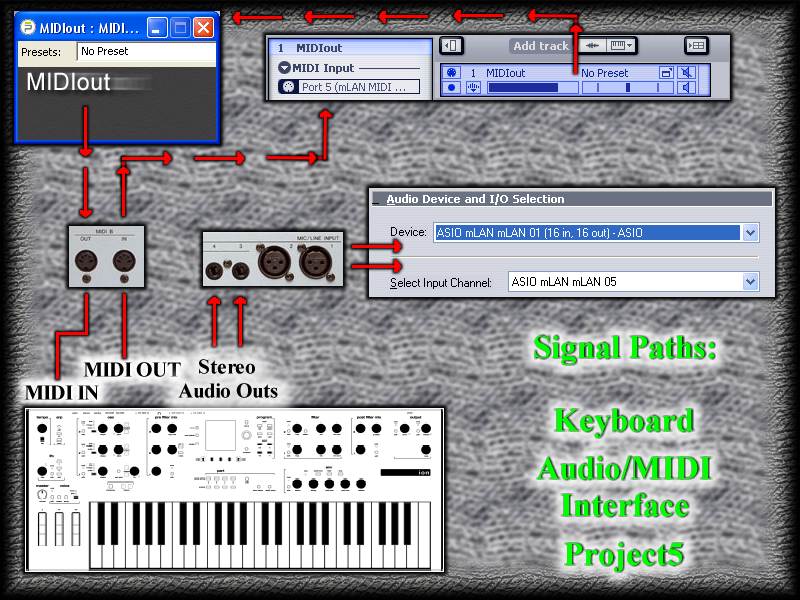
Here's some added detail on the directions that various signals will route from the synth, through the computer appication, and back to the synth again. While it may appear complex, this is the essential setup:
- The hardware synth is set to Local Off, and the MIDI cables are connected to your soundcard. MIDI In to MIDI Out; MIDI Out to MIDI In. Audio outs from the synth connect to your soundcard, and are selected in the Options/Audio menu.
- One synth track is created by loading the MIDIOut DXi plugin, and the appropriate input Port is selected. '''[No MIDI Override!!!]''' One audio track is created for monitoring the results.
- Any desired MIDI FX plugins are loaded in the (MIDIOut) synth track, and configured to taste. The final connection is made by clicking on the MIDIOut plugin's text, and selecting the soundcard port that connects to your synth's MIDI In.
The MIDI FX
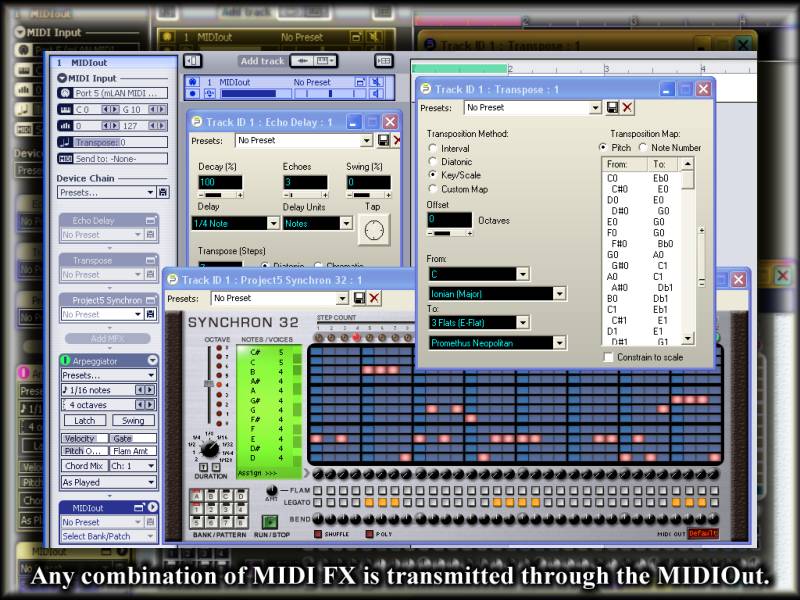
There's not much further explanation needed here. Start loading up MIDI FX plugins, and the processing will be routed to your hardware synth's internal MIDI, then on to the sound engine. a scant few plugins (like Quantize, as one example) transmit an All Notes Off message that'll temporarily shut down your synth, making these particular plugins useless in this setup. But there are plenty that will work superbly.
Synchron32 adds step sequencing; the Project5 Arpeggiator (or Cakewalk's Arp) do their magic; Echo Delay configures real MIDI note echoes and "bell-tree" transpositions; Transpose re-routes input to different scale outputs. You can even Transpose in-track without ''any'' plugins. There are many other free/commercial MFX plugins that produce great results, and their effects are produced within the hardware synth itself. Audio is reflected back into Project5 for recording.
MIDI Thru: Recording MIDI FX
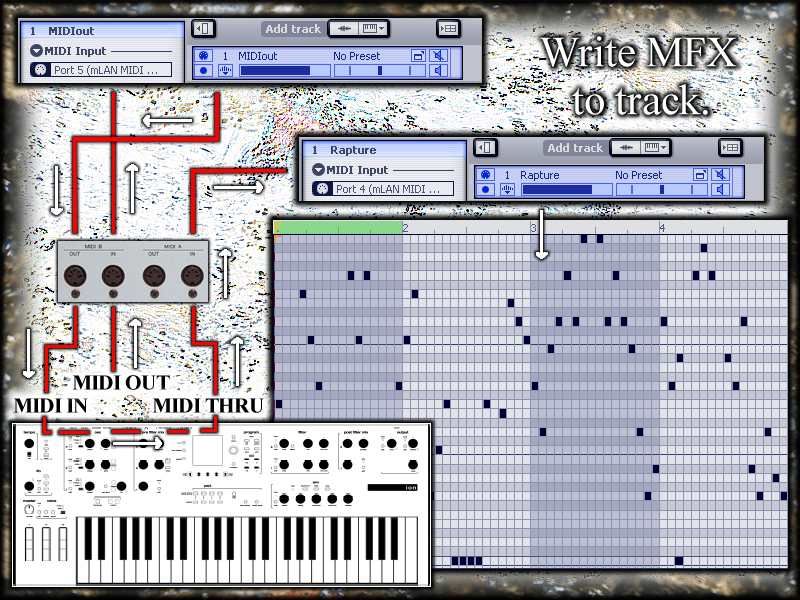
There are several ways to use the MIDIOut plugin to record MIDI FX processing to a track in Project5.
- Use virtual MIDI routing as detailed in this article: Arpeggiator Signal Flow
- Short your soundcard's MIDI port by connecting the MIDI out jack to the MIDI In jack with a single MIDI cable. See #17 and #18 in Extreme SFX
- Use more than one set of MIDI ports to route to separate tracks; each with their own processing chain.
- USB keyboard controllers can be configured to write arpeggiators and MIDI FX over multiple tracks.
- Using a Rewire-compatible application, route your MFX-processed tracks into another host for MIDI/audio recording of hard data.
But in this hardware setup under discussion, there's a bonus: ''Anything'' that's been processed and sent back to the hardware synth can be routed back to another MIDI track. The information will be written through a proxy VSTi/DXi synth track, and available for further manipulation in the Editor, or with additional audio/MIDI FX. What makes this possible (and easily done) is having a MIDI Thru jack on the hardware synth.
MIDI Thru takes an exact copy of what's received at the MIDI In jack, and routes it internally to the MIDI Thru jack. It's a handy feature for daisy-chaining multiple hardware synths together. But in our particular signal flow here, it also means duplicating whatever processing has taken place in Project5 and the MIDI FX. In a common two-Port soundcard design, the MIDI Thru signal is routed to the second available Port. MIDI travels out of the synth, through MIDI FX processing, back into the synth, and a copy of that gets sent to a second MIDI track.
You now have the best of both worlds: Hardware synth MIDI/audio, MIDI FX processing in software, and the ability to print that information for use in your host application's virtual synthesizers. With a small investment in effort, you can use this union to great advantage. It's a good time to be alive.
-b rock